
01Match the Artifact to the positive cell
Start with the Artifact that keeps your current build working, then put it on a positive cell in the Tablet’s pattern. Check the negative cells as carefully as the green ones. The official diagrams below make that tradeoff visible: being next to a Tablet is not enough to make a slot useful.
These are TEAM HORAY’s 1.0.19 release diagrams in their illustrated orientation. Use the marked cells as the reference for these examples, then compare your current in-game preview when moving or rotating a piece.

Competition: put your priority Artifact below
The cell directly below has +3. The two marked cells above have −1 each. Move a key Artifact out of the red cells before judging whether another Tablet improves the board.
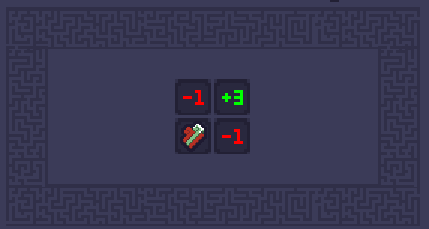
Wave: aim the upper-right bonus
Use the +3 cell diagonally above-right for the piece you want to support. The cell above and the cell to the right have −1. A neighboring slot can therefore be a worse choice than the diagonal one.
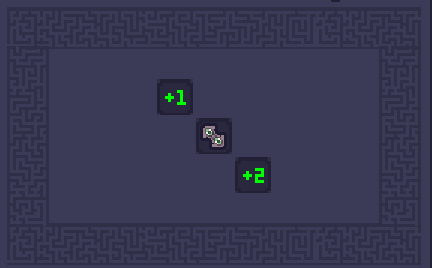
Preparation: choose between its two diagonals
The illustrated lower-right cell gives +2 and the upper-left gives +1. If both Artifacts are useful, put the one needing more support on the stronger cell instead of treating the two corners as equivalent.
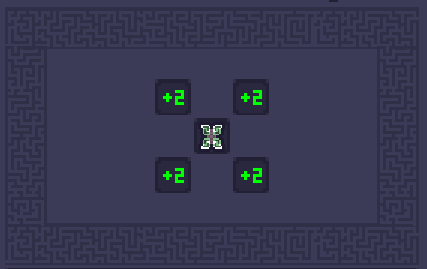
Daydream: use the four immediate corners
Each immediate diagonal cell is marked +2. This footprint suits several useful pieces around one Tablet. Compare how many of those corners your actual inventory can use before allocating the space.
TEAM HORAY · 1.0 release notes and original pattern images · July 31, 2026
02Improve your working build before filling every slot
A board with more occupied cells can still perform worse if the main damage piece loses its support or a required effect moves into reserve. Pick the item keeping your attack loop active, give it a usable positive cell, then arrange the remaining pieces around that choice. Add coverage only when the extra supported items contribute to the run you are playing.
| Your situation | First placement decision | Compare afterward |
|---|---|---|
| One Artifact keeps the attack loop active | Give that piece a useful positive cell. | Whether moving it breaks its trigger or other useful support. |
| Several Artifacts contribute meaningful damage | Try a pattern with several usable positive cells. | How many of those cells can actually hold pieces you want. |
| A good item is sitting on a red cell | Move it away from the penalty first. | Its displayed effect before buying another support piece. |
| The inventory is full | Choose a reserve candidate before moving the core. | The active effect you lose by putting that item in Side Bag. |
For a concrete first move, put the chosen Artifact below Competition rather than in either red cell above it. Check its displayed level or effect, then compare the rest of the board. If you use Wave instead, place the target above-right and check the two penalty cells. Change one relationship at a time so you can see which move helped.
03Fix the effect that disappeared after rearranging
- Artifact became weaker: inspect its cell for a penalty and check which positive support you moved away.
- A combination stopped working: check both the items and the required direction. White Paper, for example, uses its left and right neighbors; moving the pair above and below changes that arrangement.
- An owned item contributes nothing: check whether you moved it into Side Bag. Stored items are inactive; return the piece to the active board before the next fight.
- A new Tablet creates no useful gain: compare the support it adds with the board space and existing relationships it displaces. Keep the working layout if the trade is worse.
04Save a candidate board, then compare it in-game
Use our Planner to sketch a candidate arrangement, rotate selected icons and save a local copy before testing the move. Export JSON to keep alternatives or use a fragment share link to show the board to a friend. The Alpha is a visual workspace: compare the actual affected cells and effects in the game before keeping an arrangement.
Sketch, save and share your boardIf you want automated placement suggestions, ForestSquirrel’s community solver offers coverage, high-value and target-value modes. Choose the goal that matches your problem: supporting one important item and covering many items are different objectives. Its author notes that results can vary between runs, so compare a few candidates against the pieces you own.
Read the solver author’s instructions05Sources and further reading
The directional examples use the official diagrams; the placement priorities and troubleshooting order are our editorial analysis. The community solver is an independent tool.
- TEAM HORAY · Sephiria 1.0 release notes: Tablet changes and inactive Side Bag
- Official Steam store: Artifacts, Tablets and inventory mechanics
- ForestSquirrel · How to place tablets for best configuration